SAB (Scorpion Antennas and Batteries) primarily focused on manufacturing and designing high-quality radio-controlled (RC) helicopters.
warning
R/C helicopters are not toys. R/C helicopter utilize various high-tech products and technologies to provide superior performance.Improper use of this product can result in serious injury or even death. Please read this manual carefully before using and make sure to be conscious of your own personal safety and the safety of others and your environment when operating all RC Helicopter products. I assume no liability for the operation or the use of this product. Intended for use only by adults with experience flying remote control helicopters at a legal flying field.
tip
Safety is paramount. Always follow safety guidelines, such as not flying near people, animals, or obstacles. Maintain a safe distance from other RC enthusiasts. Wear safety glasses to protect your eyes from debris.
Here ’s a brief overview of some SAB RC helicopter models:
- Goblin Series
- The Goblin series is one of SAB ’s flagship lines of helicopters.
- Goblins are known for their high performance, precision engineering, and innovative design.
- Different Goblin models cater to various skill levels and preferences, from beginners to advanced pilots.
- RAW
- RAW is another series of helicopters from SAB.
- These helicopters are designed for extreme 3D flying, agility, and aerobatics.
- RAW helicopters typically feature a robust construction to withstand aggressive maneuvers and provide a thrilling flying experience.
Why are RC Helicopter so fun?
tip
Page is under construction - setup - flight log
warning
- R/C helicopters are not toys.
- R/C helicopter utilize various high-tech products and technologies to provide superior performance.
- Improper use of this product can result in serious injury or even death.
- Please read your manual carefully before using and make sure to be conscious of your own personal safety and the safety of others and your environment when operating all RC Helicopter.
- I assume no liability for the operation or the use of this product.
- Intended for use only by adults with experience flying remote control helicopters at a legal flying field.
tip
- Safety is paramount.
- Always follow safety guidelines, such as not flying near people, animals, or obstacles.
- Maintain a safe distance from other RC enthusiasts.
- ALWAYS wear safety glasses to protect your eyes from debris.
- Better safe than sorry.
SAB Goblin RAW 580
The new RAW 580 use the same module from Kraken 580.
- Incredible strong Power train enclosed in aluminum case,
- Ultra light 7075 aluminum alloy highly adjustable rotor head with super simple Tail group,
- Aluminum Boom 30 mm
- Easy maintenance
- Main blades up to 600mm.
Technical specifications
- AIRFRAME weight: 1740gr ( with S580 blades, no battery, no electronics )
- Main blade length: 550mm to 600mm
- Tail blade length: 95 to 105 mm
- Main rotor diameter: 1290 mm (with 580 mm blades included)
- Tail rotor diameter: 260 mm (with 95 mm tail blades included)
- Cyclic Servos: mini cyclic servo (torque over 8 Kg* cm).
- Kit includes servo mounts for mini servos.
- Full size servo mounts available separately.
- Tail Servo: standard size 40mm.
- Main Rotor ratio : 11.5 to 8.6 :1 ( 22T included: 9.4:1)
- Tail Rotor ratio : 5.3* 4.9:1 ( 23T included: 4.9:1 )
- Typical motor : 4025 series, 6S 1000-1200 Kv, 12S 500-600 Kv. Minimum motor shaft length is 26mm (We recommend using a 6mm diameter motor shaft)
- Typical speed controller: 6S 120-140 A, 12S 100-130A
- Battery size: 6S 5000/5800 mAh, 12S 2600/3200 mAh.
Read more at https://goblin-helicopter.com/products/goblin-raw-580
SAB Goblin RAW 580 manuals
- 📔 Download SAB Goblin RAW 580 manual - PDF - 6.8MB
- 📗 Download SAB Goblin RAW 580 checklist - PDF - 11.5MB
- 📙 Download SAB Goblin RAW 580 safety warnings - PDF - 3.4MB
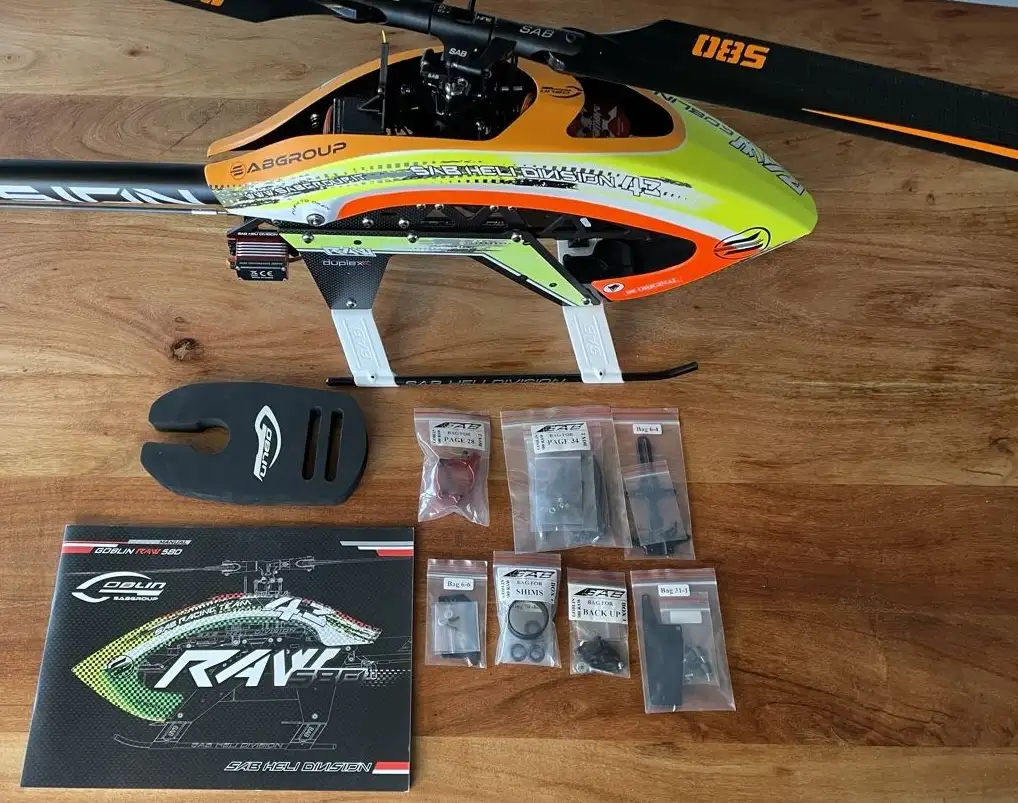
My SAB Raw 580
My first full size build since 2004, what a jump in size compare to my two Omphobby m2 😅
Buying a used RC (Radio-Controlled) helicopter carry some risks
Buying a used RC (Radio-Controlled) helicopter can be a great way to save money, but it also comes with certain risks. It’s essential to conduct a thorough inspection and ask pertinent questions before making a purchase. If you’re not familiar with RC helicopters, consider bringing along someone with experience or seeking the advice of a knowledgeable friend or expert in the hobby.
Here are some potential risks and considerations to keep in mind:
Condition of the Helicopter:
- Physical Damage: Check for any visible signs of damage such as broken or bent parts, cracks, or missing components.
- Wear and Tear: Assess the overall wear and tear on the helicopter. Overused components may be more prone to failure.
Mechanical Components:
- Motor and Servos: Check the motor and servos for proper function. Listen for any unusual noises during operation.
- Battery Health: Batteries degrade over time. Ensure that the battery is still holding a charge well and hasn’t swollen, as this can be a sign of damage or age.
Electronics and Wiring:
- Receiver and Transmitter: Verify that the RC transmitter and receiver are in good working condition. Check for any loose or damaged wiring.
- Electronic Speed Controller (ESC): Ensure that the ESC is functioning properly and not showing signs of overheating.
Flight History & Crash History: Inquire about any crashes the helicopter might have had. Frequent crashes can lead to hidden damage and affect the overall performance.
Availability of Spare Parts: Check if spare parts for the specific model are readily available in case you need to replace or repair components.
Upgrades and Modifications: Find out if the previous owner made any modifications or upgrades to the helicopter. While some upgrades can enhance performance, poorly executed modifications may lead to issues.
Documentation and Manuals: Ensure that the seller provides you with the user manual and any relevant documentation for the helicopter. This will be helpful for maintenance and troubleshooting.
Price Considerations: Research the market value of the specific model you are interested in. If the price seems too good to be true, it might be worth investigating further.
Test Flight: If possible, request a test flight to observe the helicopter in action. Pay attention to how it handles, any abnormal vibrations, or erratic behavior.
Trustworthiness of the Seller: Consider the reputation of the seller. If buying from an individual, ask questions about the helicopter’s history and maintenance.
Costs if it would be new:
| Item | Price |
|---|---|
| SAB 580 Kit | 738.- |
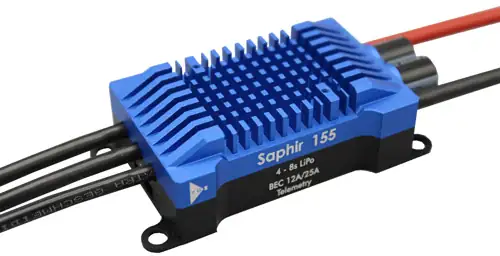
| Regler: YGE Saphir 155 | 349.- |
| Motor: Xnova Lightning L4025 1120 8P | 265.- |
| KST Servo X20-2208 V2.0 / X20-1035 V2.0 - Combo Heli-Set | 560.- |
| Optipower Ultra Guard 430 super combo inkl. LED | 76.- |
| Aluminum Rear Standard Servo Mount H1207-S | 12.- |
| Aluminum Front Standard Servo Mount H1217-S | 24.- |
| Battery Tray x 2 H1102-S | 42.- |
| Misc. parts | ???.- |
| TOTAL | 2066.- |
info
YGE have good ESC BUT
- their software to manage settings is Windows only and outdated
- no iOS or android app
- no WIFI, Bluetooth wireless connection
- Their firmware is signed to stop piracy: you must send an email with your serial to get a signed firmware! For all these reasons I DO NOT recommend YGE ESC.
Hobbywing are <50% cheaper and have iOS/Android App
I added the missing parts:
| Item | Price |
|---|---|
| Rotorflight F722 FBL v2 incl ELRS RX | 72.- |
| SLS Quantum 5000mAh 6S1P 22,2V 65/130C | 158.- |
| SLS Quantum 5000mAh 6S1P 22,2V 65/130C | 158.- |
| RETAINING COMPOUND High Strength Bond SAB HA115-S | 11.- |
| THREADLOCKER Medium Strength SAB HA116-S | 9.- |
| Misc grease: lithium, Silicone | 41.- |
| TOTAL | 376.- |
3D printing
- SAB Goblin RAW 580 3d print at MakerWorld (Bambu lab - Free)
- SAB Goblin RAW 580 3d print at Thingiverse (All - Free)
- SAB Goblin RAW 580 3d print at Printables (Prusa - Free)
- SAB Goblin RAW 580 3d print at Cults3D (All - Free & $$$)
- SAB Goblin RAW 580 3d print at Yeggi (All - Free & $$$)
Lipo choice
| Your flying type | # Cells Lipo | Direction | Price |
|---|---|---|---|
| Slow flying, sport, learning | 6S | e.g. SLS X-CUBE 5000mAh 6S1P 22,2V 30C/60C | 99.- |
| 3d hard | 6S or 7S | e.g. SLS Quantum 5000mAh 6S1P 22,2V 65/130C | 158.- |
| 3d rocket | 12S | > 350.- |
Servo choice
The X20 Combo set including three X20-2208 V2.0 Cyclic Servos and one X20-1035 V2.0 Tail Servo is now available. The X20 Servos feature brushless motors, full CNC aluminum cases, and a complete set of hardened steel High Life Span (HLS) gears throughout each servo. Each gearbox is equipped with 6 ball bearings to maintain a slop-free gear train. The cyclic servos boast an incredible 2.5N.m of torque at 8.4V, and a crisp 0.07 second speed. The tail servo offers 1.2N.m of torque at a blistering fast 0.03 second speed at 8.4V. Ideal for 500 to 800 Class EP/GP Helicopters.
Tools
- RETAINING COMPOUND High Strength Bon. Artikel-Nr. HA115-S
- THREADLOCKER Medium Strength Artikel-Nr. HA116-S
Crash costs
Prices in Switzerland of some parts, to get an idea of operating (crash) costs.
| Item | Price |
|---|---|
| Main blade | 27.- |
| Tail blade | 27.- |
| Tail belt | 27.- |
| Spindle tail | 11.- |
| Spindle main rotor | 11.- |
| Steel main shaft | 18.- |
| Tail boom | 24.- |
| Canopy | 99.- |
| Full landing squid | 16.- + 29.- |
Building the SAB Goblin RAW 580
WestHobbiesRC has some good video that you can use with the manual to enhance your build experience.
more videos at https://www.youtube.com/@westhobbiesrc8051
SAB Goblin RAW 580 Setup
tip
Work in Progress
Setup found on the web
EdgeTX files
tip
This SAB 580 edgeTX configuration based on Jonas Wackershauser omp hobby m2 configurations, What I consider the most advanced, freely and open source edgeTX configuration available.
In EdgeTX, the “input” (stick positions) from the sticks travels to the RF channel output (signal out the RF module) like this: Sticks (hardware) ⇒ Inputs (config) ⇒ Mixer (config) ⇒ Outputs (config) ⇒ RF module (hardware)
Features
- Deadband fix preapplied, expo ready (set expo in Mixes tab)
- Three flight modes with dedicated collective curves
- Custom rescue mode with flight mode dependent collective curves
- Zorro: RPM reduction switch intelligently combined with self level switch to enable additional headspeeds
- TX16S: 6-pos switch allows for 5 additional, lower RPMs in lowest headspeed setting
- Dual throttle hold switch for safety with timer reset function if both switches are pulled
Radiomaster Zorro Default switch assignments
- A: Rescue button
- B: Flight mode switch (3 fixed RPMs)
- C: 3D mode headspeed switch reduction, self leveling with headspeed reduction
- D: N/A
- E: Throttle hold switch 1
- F: Throttle hold switch 2
- G: N/A
- H: N/A
warning
- File may be updated without notice if issues are found or when I find ways to optimize them further.
- This file is tested on RadioMaster Zorro and use the external ELRS module.
- These setups are provided as-is, should be understood as a recommendation and may not suit everyone.
- I assume no liability for the things you do with your helicopters using this setup.
- Check all flight controls, functions and switches without blades before your first flight.
- I cannot provide individual support for these setup files. Especially for installation instructions, Google is your friend.
- These setup files require EdgeTX 2.9.0 or newer to function.
- I can not and will not provide OpenTX files.
- Feedback is welcome
Downloads
Link available soon!
Setup details
| Channel | Function | Direction |
|---|---|---|
| 1 | Aileron | Inverted |
| 2 | Elevator | |
| 3 | Throttle | |
| 4 | Rudder | Inverted |
| 5 | Stability mode (ON/OFF) | |
| 6 | Collective Pitch |
Flight modes are used: RPM, Pitch and Rescue Pitch are different in the main 3 Flightmodes, the 6POS even lowers the low-RPM Flightmode’s RPM further.
Freely assignable switches through Logical Switches menu L04: Switch F -> throttle hold L04: Switch E -> throttle hold L08 : reset timer, throttle hold, SE & SF
Curves
- HLD
- curve that maintain the throttle at 0
- CP1
- collective pitch curve for normal mode with pitch -100 to 100
- CP3
- collective pitch curve for idle-up 1 with pitch -95 to 95
- CP3
- collective pitch curve for idle-up 2 with pitch -90 to 90
- CPL
- collective pitch curve beginner friendly (no negative collective)
- With self level mode
- With reduced rates
- DBD: dead band curve
- Deadband was adressed in a 5POS-Curve for aileron and elevator saying -100=-100, -1=-8, 0=0, 1=8, 100=100. Therefor -7 to 7 is skipped.
- The deadband is achieved with the deadband by mixing “ail” and “ele” with the curve “dbd”
tip
- Deadband negates the first 5% of your input completely
- Expo reshapes the entire control curve for more lenient or aggressive rotation rate for a given input.
Add a deadband removal curve then coutereact that by adding positive expo… because with the combination of the two is taking out the deadband first, so that even the slightest stick input from 0 results in a rotation of the helicopter, and then reshaping the resulting curve beyond the deadband so that a certain amount of stick travel, even beyond the deadband, results in a rotation rate that is comfortable for the pilot.
Which Rotorflight FBL Controller
I recommend you to use one of the dedicated FBL controller designed for RF2
- Flydragon F722 or
- Radiomaster Nexus
tip
Flydragon F722 designer is available for help on discord, “Mo” User that I want to credit here for his help I will also help improving the documentation later in http://www.rotorflight.org
The Google drive with all files you will ever need from the manufacturer is Rotorflight Flydragon F722 Google Drive
